Overloading the indexer operator in C#

There’s a feature in C# that’s very useful for some use cases, yet many people seem to overlook it. I’m talking about the indexer operator. What this operator does is, it makes it possible to access elements of an enumerable data structure that your class makes use of, with the familiar [] operator.

Let’s say we have a class named Car:

Now let’s say that we have multiple cars, multiple instances of the class Car and that we want to organize them in a collection. What should we use? A plain old Generic List you might say and you would be correct, but what happens if we want to augment that list with more operations, more car-specific operations. Perhaps we want to clean the cars, or repair them. All that logic can nicely go inside a class named Garage:

As you can see we still use a List to store the cars, but we’re using the delegate pattern. A generic list has a bunch of methods but we only need three of them, the Add(), ElementAt() and Remove() methods. Oh and we also need the Count property so that we know how many cars we have.

This is an initial draft of our garage class showing the use of the delegate pattern. We can also include other stuff to make the class resemble real-life garage even more

The addition of the Clean() and Repair() methods improves our Garage implementation but there’s something missing. Every time we want to access a specific car by index we are forced to use the Get() method. It’s counter-intuitive. Here’s where the powerful indexer operator comes into play. After we’ve implemented an indexer operator in our collection class we will be able to access car elements with array-like syntax, like this:

Let’s see how simple it is to do that

So basically, you override the indexer operator like a property, with a getter and a setter. In this particular example we don’t want to be able to manipulate the contents of the garage so we don’t need a setter. But using a setter is a totally legitimate operation and one you will probably find pretty helpful once you start using it. That’s how easy it is 🙂

Check the whole project on this GitHub repo

How to use momentjs with Vue

Okay this is going to be a short one 🙂

Momentjs is, without a doubt, the best JavaScript library for handling date and time objects. The first time I tried to use it with Vue though I was greeted with the following message:

"Property or method "moment" is not defined on the instance but referenced during render. Make sure to declare reactive data properties in the data option"

The reason why I got this message was because I was using moment in the view, in my .html file within Vue’s {{}} delimiters. Let’s demonstrate this with a simple example.

In the fiddle above we have a simple Vue instance with a list of posts that will be displayed in a simple table for approval. Everything is simple. We use v-for loop to get each post and then display its data in the table columns. But the postedAt field is a date! We can’t trust JavaScript to convert our date to a string otherwise it will look awful with all the added stuff like time zones. Let’s say we want to just format the date using a DD-MM style, meaning that we only want to display the day and month. Nothing else. What comes to every developer’s mind is, of course, the moment library. So that’s what we do. We import moment using whatever tool we want, yarn, NPM, jspm, pure script tag with a CDN URL. Just about anything will do. Then assuming that what’s inside the curly brackets is JavaScript code, we attempt to run the example…. Aaaand we get the error mentioned above. You can actually see it in the console.

Why is this happening?

It’s all a matter of “this” binding. Notice that whenever you display something in your View that comes from the view-model you do not use the ‘this’ keyword like you do inside the view-model. That’s because the view is tied to the view-model and the use of ‘this’ is not needed. Imagine if you had to use ‘this’ in your HTML. That would be awful. The moment instance is not in our view-model. It’s in the global object, window in this case . “So let’s just go ahead and put a ‘window’ keyword in front of moment”, you might say. Not so fast. The window object is in the global scope too. So you’ll get the same error.

What can we do to remedy this?

We need to include a reference of the moment function in our view-model. The solution is actually pretty straightforward. Just add this line

moment: moment

either in the ‘data’ object or in the ‘methods’ object of your view-model. And that’s it. It’It’s going to work. What we essentially did was to delegate moment through our view-model. See the working example:

And there you have it! Momentjs up and running with Vue in no time.

Ridiculously simple form validation with Vue and VeeValidate

Today a friend of mine and fellow developer was asked during the technical part of a job interview to create a registration form along with both client-side and server-side validation having only a small time frame at his disposal and absolutely zero code. This event led me to write the post you are currently reading. This is a very common interview question for jobs regarding web development or Single Page Application development roles. I’ve been asked to write a form with validation in an interview too. In fact I have even asked candidates, from the other end of the table that time, to complete a registration form when tasked with coming up with an interview question for a role at a startup I used to work for.

Anyway, the point is that this is something that gets asked a lot and it’s good to be prepared. I’m going to leave server side validation for another blog post and concentrate on the client side of things. When the clock is ticking and the first traces of anxiety start to appear you need to be prepared. Ok, designing the form is not hard. You can grab your favorite framework like Bootstrap, Foundation, Material or whatever suits your taste.

The most time consuming part of the task is the validation process. So I sat down and tried to think of a validation library that produces the fastest results. I have used several JS validation libraries in the past like ValidateJS, Parsely and Aurelia Validation but, by far the most efficient and, in my opinion, the most architecturally correct is VeeValidate. VeeValidate is an open source Vue.js plugin. In case you’ve never heard about it, Vue.js is a reactive, progressive JavaScript framework that recently reached version 2. It’s being used and recommended a lot by the people at Laravel, so much that it can be mistaken as part of the framework itself.

It’s amazing how quickly you can get up to speed with VeeValidate. To begin with, there are, mainly, two ways you can get it in your project. The simplest one is to just include the script tag

<script src="https://cdn.jsdelivr.net/vee-validate/2.0.0-beta.25/vee-validate.min.js"></script>

You then have access to VeeValidate as a global object.

The other way to go is to install it with npm and import it as an ES6 module in your application. (Reminder: At the time of this writing, ES6/ES2015 modules are not globally supported by most browsers so you’re going to need a bundler like Webpack)

Whatever way you choose you then have to register the plugin with Vue. To do this add the following line:

Vue.plugin(VeeValidate);

UPDATE 09/2017
If you’re using the newest version of Vue you will have to include VeeValidate using Vue.use

Vue.use(VeeValidate);

All set. You can begin using it. (If you dig deeper into the documentation you will see that you can also pass in a config object but that’s not the purpose of this tutorial. We want results fast with minimal configuration and VeeValidate can provide them out of the box).

Now to the best part which is also the reason why I said before that VeeValidate is the most architecturally correct validation library I have used is that you can write your validation exclusively in the view. In your .html file. That reduces view model pollution and makes it more testable. That way you can quickly switch views if you want without having to clean your view-model. That’s not to say that you will never need to write code in your view model but for most cases, at least 90% percent of the validation code will reside in the view.

VeeValidate supports a variety of validation rules which you can apply in a way similar to Laravel’s validation for those of you familiar with it. The basics of working with rules are:

• Rules are placed in a v-validate custom html attribute inaide the input that needs validation
• Rules are separated with a pipe (‘|’) just like in Laravel
• The input that you want to validate must have a name attribute.
• You can access the error messages by using the “errors” variable in the view
• You can check if a specific field is valid by checking if errors.has(““)
• You can access the first error message for a specific input with errors.first(““)
• You can access all error messages for a field using errors.all(““)

That’s essentially what you need to know to work with VeeValidate. Let’s skip the introduction and look at the code. Let’s say that you want to validate a password field. You want a password to always be present, so your password field is “required”. You also want it to be at least 8 characters long but no more than 32 characters. You can achieve it like this:

<input name="password" type="password" placeholder="Choose your password" v-validate="required|min:8|max:32">

To show an error message when the validation fails:

<span v-if="errors.has('password')">{{errors.first('password')}}</span>

Now that you know what VeeValidate is and how it works let’s move on to the form creation. I’m going to be using Bootstrap 4. You can swap the CSS classes with your own:

So as you can see the view model remains as clean as possible. All the validation takes part in the view and that’s what makes the library so awesome. Now if you want to provide custom error messages you will need to write some JavaScript code too but it does not have to be inside the view model. For more information check the official documentation http://vee-validate.logaretm.com/rules.html#custom-messages

It took me 34 minutes to create this form from scratch. I could have gone so far as to trying to achieve the same result using the validation libraries I mentioned above but that would make the post enormous and hard to write as well as read so I guess you’ll have to take my word for it.

The proper way to dynamically create a two-dimensional array in C

When I began working with matrices in C, I was obsessed with malloc. I almost never defined static arrays, because I thought that malloc turned me into a ‘Memory God’ capable of managing memory efficiently and improving loading and response times of my application, all while not putting the burden on the operating system. So, I quickly figured out how to dynamically allocate a two dimensional array. This is what I used to do in order to create a 10×5 array of integers:

After the job was done, I used to free the matrix like this:

Someone might ask: “What’s wrong with that?”. Well, for most intents and purposes this code works perfectly fine, but there is one subtle issue with this code and chances are that, if you use something like that, you are not even aware of it. The problem with this code is that it goes against the way C allocates static matrices in memory.

When you create a static 3×3 matrix in C like this:

int staticMatrix[3][3];

the memory blocks allocated for each column stand each next to each other as demonstrated below:

2darr1

The green blocks are the columns of the first row, the red blocks are the columns of the second row and the purple blocks are the columns of the third row. This two-dimensional array or array of arrays is actually a contiguous block in memory.

This is also the reason why the second dimension is always required when passing a 2D array to a functionË™ the compiler needs to now the offset between rows, because in memory there are no actual dimensions. To better explain this, let’s assume you have this function that takes a 2D array and does some operations on it (we do not care about the exact operations):

void workWithMatrix(int matrix[][3]);

We are required to specify the number of columns, but not the number of rows (although we can include that too, if we want). That’s because, every time we use the indexer operator, the compiler translates our statement into a pointer. If the following statement exists within workWithMatrix:

int value = matrix[2][1];

The compiler will “translate it” to this:

int value = *(matrix + 2*3 + 1);  //*(matrix + 7)
[\c]

If the statement was:


int value = matrix[1][1];
[\c]

It would translate into this:


int value = *(matrix + 1*3 + 1);  //*(matrix + 4)

Notice the number 3, that’s the offset, a.k.a. the number of columns, a.k.a. the number of blocks between two rows.

This is a visual illustration of how the compiler treats your 2D array as a single dimension one.

2darr2

The following is a typical illustration of how the dynamic matrix we created with malloc gets stored in memory:

2darr3

As you can see, the blocks may be consecutive or they may not, there is no guarantee. That rarely causes a problem in most C programs, but when you have some advance logic, you want the matrix to be stored in contiguous blocks (for example, when creating a derived data type in MPI). To fix this, let’s introduce the correct way to dynamically allocate two dimensional arrays. What we want is to emulate a static array and from what we’ve seen, a statically defined 2D array is actually a one dimensional array (since there’s no such thing as a dimension in memory). So, when we want an NxM matrix, we first need to create a one dimensional array containing NxM elements, and then we create an array of pointers and make them point to the correct place in memory.

In the following example, N=3 and M=3.

In steps:


1. Create a one-dimensional array of 3×3=9 elements: 
2darr4

2. Create a one-dimensional array of N=3 pointers (equal to the number of rows):
2darr5

3. Loop through the array of pointers and make them point to the start of each row, first one to array[0], second one to array[3] and the third one to array[6]:
2darr6

4. Use the array of pointers (which is an int** for integers, a float** for floats, etc.) to reference the elements using the indexer operator []

 
And the long awaited code to achieve the above:

After we’re done with the matrix, we need to free any memory associated with it. To do that, we need to use a different approach than just looping through the rows and freeing the columns. This approach is actually faster and simpler. Straight to the code:

Remember that matrix[0] is an array in and of itself. So we just need to free that, and also free the array of pointers. Pretty simple stuff.

I’ve also included some more helper functions for matrix operations. You can check them out here

I hope you liked this post and found it helpful. Have a nice day!

How to trigger a CSS animation on button click

In this tutorial we are going to see how to create a CSS animation and trigger it every time we click on a button. We’re going to use pure JavaScript. We’re not going to use jQuery because it’s not really needed and as we’ve seen in a previous blog post jQuery makes our scripts slower so avoiding it whenever possible will transform our code to be more efficient even if it may take a few more lines to achieve the same thing.

This example’s use case is a pretty common one, you have some data displayed to the user via a grid, a chart or simply an unordered list and that data may change overtime so you want to give the user the change to reload the data again from the server asynchronously. Usually for that kind of task you will need to employ a user-friendly icon button and not just throw a “Refresh” button. Something like this:

refresh

looks way more slick and increases the UX points of your site. The reason for this is that the user prefers to scan the page instead of reading it so removing unwanted text from action buttons and filters actually makes the browsing experience faster and more pleasant. Adding to that, users find it easier to use an interface that seems familiar to them. A refresh button like the one above is something that the user sees and utilizes in a regular basis in other applications like the operating system (especially mobile OSes) and the browser itself.

Enough talking, let’s get to the code. We’re obviously going to need a button and a refresh icon. We get the icon from FontAwesome (https://fontawesome.io/icons/) and style (using Sass of course) the button a bit to remove borders, make its background-color transparent, put a nice color to the refresh button and change the cursor to the “hand pointer” when the user hovers over the button.

Ignore the animation stuff for now and focus on the icon-btn class used to render the button. We’ll get to the animation mixins shortly

When it comes to animations that need to support a variety of browser versions we tend to get lost in the chaos of vendor specific prefixed but Sass, as always, comes to the rescue. To create the animation we use the @keyframes keyword and state that we want our animation to rotate the icon 360 degrees.The @-webkit- prefix is used to ensure Safari 4.0-8.0 compatibility.

Then we need a class that will apply the animation to the icon, let’s name it ‘spin-animation’. Every time we apply this class to the icon the icon will spin. We need to provide 3 details to the browser’s animation engine:
– The animation name, spin
– The animation duration, say, 0.5 seconds,
– The animation timing function. For this example we set it to ‘ease-in’ so our animation starts slowly and then builds up speed fast.

To include all possible vendor prefixed we create a mixin for each of these properties, animation-name mixin, animation-duration mixin and animation-timing-function mixin. We also create one fourth mixin that takes three parameters, the animation name, the animation duration and the animation-timing-function and passes them to the other three mixins. That way our code becomes extremely clean because we only need to include one mixin to our .spin-animation class in order for it to work as expected.

Now to the JavaScript part. Check the updated fiddle below that also presents the JavaScript code:


Every time the user clicks on the button, the icon should spin. To do that we listen for the button’s ‘click’ event and add the ‘spin-animation’ class to the icon. If we were to stop at this point, and not include the call to setTimeout, the code would actually work. The icon would spin on button click. But it would spin only once. The next click wouldn’t cause the button to spin. You can simulate this behavior by commenting out the call to setTimeout in the above fiddle. The reason why the second (and the third, and the fourth…) click fails is because the class is already set and the animation iteration count is by default set to 1 (Setting it to infinite would cause the button to spin eternally). So what do we do? We remove it after the animation is complete!. setTimeout ensures that upon animation completion after 500ms, which can be translated to 0.5s which is the animation-duration, the spin-animation class will be removed from the icon thus allowing the button to spin when the class is added again in the future.

That’s how you can work with animations that need to run for a finite number of iterations when triggered by some DOM event. That’s all for today! Bye!

Object Property Descriptors in JavaScript

If you’ve ever used JavaScript there is a 99.9999999% change that you’ve used objects. That’s obvious. What is not that obvious is that there is more to an object and its properties than what meets the eye. ECMAScript 2015 introduced the concept of property descriptors. A property descriptor is essentially a set of property metadata that describes how the property should behave. You can access a property’s descriptor using the Object.getOwnPropertyDescriptor function. You can define a new property along with its descriptor or modify an already existing property’s descriptor with Object.defineProperty. Let’s see descriptors in action:

var obj = {
a: 1,
b: 2,
c: 3
};

console.log(Object.getOwnPropertyDescriptor(obj, “a”));

This prints the property’s descriptor in our console window:

blog1

As you can see a property’s descriptor is itself an object with 4 properties. The obvious one is the value which is, like the name implies, the value set to the property (in this example obj.a).

The other three are the most important and the ones in need of further discussion. All you need to know is summarized in the following lists:

(defineProperty can be used to define a new property along with its metadata or modify an existing one provided that its descriptor’s configurable property is set to true)

Writable

  •  If set to true the value can be changed
  •  If set to false the value cannot be changed
    •  In non-strict mode any attempt to change the property’s value will fail silently
    •  In strict-mode any attempt to change the property’s value will trigger a TypeError

Let’s see some examples

var obj = {};

//We define a new property called 'foo' in obj with 'writable' explicitly set to true
Object.defineProperty(obj, "foo", {
	value: 100,
    writable: true
});

console.log(obj.foo);	//100;
//foo's value can be changed
obj.foo =  "foo";
console.log(obj.foo);	//'foo'

When we explicitly set ‘writable’ to false, the property’s value cannot be changed after the initial assignment.
The first example runs in non-strict mode while the second one is in strict mode and therefore the assignment of property ‘foo’ results in an error

Example #1: Non Strict Mode

var obj = {};

//We define a new property called 'foo' in obj with 'writable' explicitly set to false
Object.defineProperty(obj, "foo", {
    value: 100,
    writable: false
});

console.log(obj.foo);	//100;
//Assignment fails silently
obj.foo =  "foo";
console.log(obj.foo);	//100

Example #2: Strict Mode

"use strict"

var obj = {};

//We define a new property called 'foo' in obj with 'writable' explicitly set to false
Object.defineProperty(obj, "foo", {
	value: 100,
    writable: false
});

console.log(obj.foo);	//100;
//Assignment fails silently
obj.foo =  "foo";
console.log(obj.foo);	//Uncaught TypeError: Cannot assign to read only property 'foo'

Configurable

  • If set to true we can use Object.defineProperty to modify the property’s descriptor
  • If set to false we cannot use Object.defineProperty to modify the property’s descriptor
  • If set to false we cannot use’ delete’ to remove the property.
    •  In strict mode a TypeError is thrown.
    •  In non-strict mode the removal fails silently
  •  Exception: If set to false the only thing allowed to change is the writable status from true to false and not vice versa (TypeError thrown)

Example #3: Setting ‘configurable’ to false and then attempting to change ‘enumerable’ to false

var obj = {
	a: 1,
    b: 2,
    c: 3
};

Object.defineProperty(obj, "a", {
	configurable: false
});

Object.defineProperty(obj, "a", {
	enumerable: false	
});	//Uncaught TypeError: Cannot redefine property: a

Example #4: Trying to remove a non-configurable property using the ‘delete’ keyword (non-strict mode):

var obj = {
	a: 1,
    b: 2,
    c: 3
};

Object.defineProperty(obj, "a", {
	configurable: false
});

console.log(obj);	//{a: 1, b: 2, c: 3}
delete obj.c;
console.log(obj);	//{a: 1, b: 2}
delete obj.a;	//Fails silently
console.log(obj);	//{a: 1, b: 2}	(a is still here)

Example #5: Trying to remove a non-configurable property using the ‘delete’ keyword (strict mode):

"use strict"

var obj = {
	a: 1,
    b: 2,
    c: 3
};

Object.defineProperty(obj, "a", {
	configurable: false
});

console.log(obj);	//{a: 1, b: 2, c: 3}
delete obj.c;
console.log(obj);	//{a: 1, b: 2}
delete obj.a;	//Uncaught TypeError: Cannot delete property 'a'

Example #6: Setting ‘writable’ to false even when ‘configurable’ has already been set to false

Have you noticed that in Example #3 the property we tried to change after setting ‘configurable’ to true is the ‘enumerable’ property even though we haven’t talked about it yet? Well the reason why, is that there is an exception to what cannot be changed once configurable is set to false and that is when ‘writable’ is true. See the next example:

"use strict"

var obj = {
	a: 1,
    b: 2,
    c: 3
};

//We set configurable to false so theoretically we cannot change anything from here on
Object.defineProperty(obj, "b", {
	configurable: false
});

//You would expect an error but this operation completes
Object.defineProperty(obj, "b", {
	writable: false
});

obj.b = 120;	//Oops! Type error

If you run this piece of code you’re going to see that we managed to successfully make ‘b’ immutable even with ‘configurable’ set to false. And this is the one and only exception to the rule. Also note that if we try to change ‘writable’ back to true it won’t work as the exception is not bidirectional

Enumerable

  • If set to true the property is enumerable and will show up in a for .. In loop
  • If set to false the property will not show up in a for..in loop


Example #7: Omitting a property from the list of enumerables


function printEverything(obj){
	for(var prop in obj){
    	if(obj.hasOwnProperty(prop)){
        	console.log(prop + ": " + obj[prop]);
        }
    }
}

var obj = {
	a: 1,
    b: 2,
    c: 3
}

printEverything(obj);	//a: 1, b: 2, c: 3
Object.defineProperty(obj, "b", {
	enumerable: false
});
console.log("");
printEverything(obj);	//a: 1, c: 3

The most common use case scenario for modifying property descriptors will probably be when you want to create an immutable property. See the following example:

Example #8: Real life scenario: Immutable Property

var obj = {
	a: 1,
    b: 2
}

//We create a new property in 'obj' setting it to 18. That value cannot be changed. 'enumerable' set to true by default
Object.defineProperty(obj, "c", {
	value: 18,
    writable: false,
    configurable: false
});

console.log(obj);	//{ a: 1, b: 2, c: 18 }
obj.c = 5;
console.log(obj.c);	//18, No error, we're not in strict mode

That’s all for now. I will be coming back with another blog post discussing more stuff about property descriptors and how you can perform common descriptor operations faster with the use of methods like seal, freeze and preventExtensions. Until then.. Keep coding….

Loose Coupling in C# Explained

Hello everyone, in this tutorial I want to provide you with a simple as possible, yet comprehensive enough example of what loose coupling really is and why it’s useful. Understand loose coupling and you’re going to have another advanced software engineering concept under your belt.

Before we start, I’m going to borrow the Loose Coupling definition from Wikipedia:
In computing and systems design a loosely coupled system is one in which each of its components has, or makes use of, little or no knowledge of the definitions of other separate components. Sub-areas include the coupling of classes, interfaces, data, and services.

The key takeaway from this is the phrase “little to no knowledge”. Object oriented programming and design offers multiple layers of abstraction for your application. That’s another key-word, “Abstraction”. Everyone who has ever taken a course on OOP or read an OOP book has stumbled upon this word and probably knows how OOP helps you achieve Polymorphism. The benefits of loose coupling include:

• Cleaner Code: After applying loose coupling your code is going to be much easier to read
• More Maintainable Code: Your code will also be easier to change
• Testable Code: This is the reason why beginners see no need for loose coupling. Because most beginners do not unit test and don’t know how hard it is to unit test tightly coupled code
• Scalable Code: I understand that in a small application loose coupling might not make any noticeable difference but in large scale projects it just makes your life a lot easier

The easiest way to explain loose coupling is actually to explain the exact opposite, tight coupling. Tight coupling is when one or more classes in your application is highly dependent on one or more other classes. Take this class hierarchy for example:

class ClassA
{
    public ClassA() { }
}

class ClassB
{
    public ClassB()
    {
        _foo = new ClassA();
    }

    private ClassA _foo;
}

In this simple example, ClassB contains an instance of ClassA and ClassB is responsible for creating that instance. So in this implementation ClassB needs to have knowledge about the inner workings of ClassA. Remember that we want ClassB to have little or no knowledge about how ClassA operates or how its objects get instantiated. The above code using loose coupling will look like this:

class ClassA : IMyInterface
{
    public ClassA() {  }
}

class ClassB
{
    public ClassB(IMyInterface foo)
    {
        _foo = foo;
    }

    private IMyInterface _foo;
}

An interface, in this very simplistic example called MyInterface, is introduced to solve the conflict. That way, any class that implements IMyInterface can be passed to class B who no longer needs to know how to instantiate it.

To provide a more real-world example, I will create a Console Application project with some rather simple functionality. It’s going to display some to-dos in the console and whether those To-Dos have been completed or not. (The full code of this project can be found here).

I’m going to create a “Models” folder to place my ToDo class first:

I tried to keep it as simple as possible, after all this is just a console application.

Next let’s create the class with the basic to-do functionality. For the sake of demonstration I’m going to actually create two classes. One will be tight coupled, the other will be loosely coupled. Let’s name them TightlyCoupledToDos and LooselyCoupledToDos respectively.

For now the two classes are essentially identical:

public class TightlyCoupledToDos
{
    public class TightlyCoupledToDos
    {
        
    }

    public async Task<IEnumerable<ToDo>> All()
    {

    }
}
public class LooselyCoupledToDos
{
    public LooselyCoupledToDos()
    {

    {

    public IEnumerable<ToDo> All()
    {

    }
}

Both have an All() method that returns a list of to-dos. The interesting part in how these two classes are going to populate the to-do list. In a real world application data like that probably come from a service. So let’s go ahead and create our ToDoService in a ‘Services’ folder:

public class ToDoService
{
    public IEnumerable<ToDo> GetAll()
    {
    	
    }
}

This is an initial form of the service. Because we don’t have an API or a database we are going to fetch data from JSONPlaceholder’s ToDo list which can be found here https://jsonplaceholder.typicode.com/todos

To parse the JSON data we will use Newtonsoft’s NuGet package. To add it:
• Right click on your project
• Go to ‘Manage NuGet Packages’
• Go to the ‘Browse’ tab
• Search for ‘Newtonsoft.Json’
• Click Install

Next we will use an HttpClient and the Newtonsoft.JsonConvert class to get the data from the API and parse them to a list of ToDo objects:

A simple enough, service implementation. It uses an instance of the HttpClient class to asynchronously read JSON data the feed them to the Json Converter for deserialization.

After having created the service, let’s use it in our TightlyCoupledToDos class to get some data.

You see the service in initialized in the constructor and the All() method uses the service to get the parsed data and return it

Let’s go in our Program.cs file to make use of the TightlyCoupledToDos class and display the list of to-dos on screen

class Program
{
    static void Main(string[] args)
    {
        ToDos();
        Console.ReadLine();
    }

    static async void ToDos()
    {
        TightlyCoupledToDOs vm = new TightlyCoupledToDos();
        IEnumerable<ToDo> todos = await vm.all();
        foreach(ToDo todo in todos)
        {
            Console.WriteLine(todo);
        }
    }
}

The Console.ReadLine() statement is there to keep the console window open for us, so that we can see the results. The ToDos() method instantiates the TightlyCoupledToDos class, gets the todos asynchronously and writes them to the output:

loosecoupling

So far so good, our classes all work and the absence of loose coupling has yet to come back and bite us. But what if we need to use another service. There are several reasons why we would want to replace the ToDoService with something else:
• We might want to test our code with fake data provided by fake service
• We might want to support different sources of data like files, APIs or databases
• We might want to conditionally supply a service to the ToDos class according to some event

It’s hard to do so when the ToDos class heavily depends on a specific service implementation. As you might have guessed it’s time to get ourselves some loose coupling. Here’s what we need to do:

• Create a IToDoService interface that will be implemented by any supporting service
• Modify our ToDoService to implement the IToDoService interface
• Create a TestToDoService that also implements IToDoService
• Modify LooselyCoupledToDos to work with either service

The implementation of the IToDoService is pretty simple:

And in ToDoService:

Now let’s create another service that will return local data to the caller instead of calling an API or querying a database. This is a rather common practice during unit tests.

The TestToDoService implements the IToDoService differently. Instead of using an HttpClient to get JSON data from the web, this class creates a list and fills it up with some dummy data to be sent to the caller for testing

Now this is the most important step of them all! We need to go to our LooselyCoupledToDos class and make it support what its name says it supports. In order to do that, the class needs to hold a reference to an IToDoService object and not a ToDoService or TestToDoService object. It also needs to take that reference as a constructor argument rather than instantiating on its own. That way our LooselyCoupledToDo class knows nothing about the actual service and thus we will have achieved the precious separation of concerns we want.

Now that we’ve implemented our classes in a loosely coupled way let’s see how easy it is to switch services. Let’s introduce a static field in our Program class that will be true if the app is in test mode and therefore needs to use test data or false if the application is not in test mode and must fetch real data:

If _testMode is true the LooselyCoupledToDos is initialized with the test service, if it is not it gets initialized with the real service.

You can see the whole project in my GitHub repository dedicated to C# here

Now that you’ve learned what loose coupling is, it’s time to take it one step further and learn about Inversion Of Control and Dependency Injection. I will be writing on those soon. Until then, keep coding!!

jQuery vs getElementById vs querySelector

Last time we talked about performance in JavaScript and how that can be measured. To better illustrate the usage of the performance.now function and how it can be used to help us decide which method we should use to accomplish a certain task in our code, this time we will test the 3 most common methods of selecting a specific DOM element:
• jQuery’s $() selector is probably the most common and the first one that comes to mind
• document.getElementById is the classic method and perhaps the function that most JS developers are taught first
• document.querySelector is a relatively recent addition to the DOM API that’s supported by the latest browser versions out there

Test Case
Obviously the selection of one single DOM element is very rapid so it’s not the best of ways to test for the efficiency of those 3 methods. We’re talking about an operation that takes nanoseconds (or even less..) to finish. So even if we had the means to get test data about such a small timeframe it still wouldn’t be a fair comparison since there countless of factors affecting the final result, like different browser threads or even different processes running on the system. To get a better understanding we need to enlarge our test pool. For that, in the following example we will use a for loop to spawn 10 thousand buttons, append them to the DOM tree and them we will use the 3 methods mentioned above to select all the buttons, one button at a time using for loops. So we want to end up to something like the following pseudocode:

var t0 = performance.now();
for(1 to 10000){
	//select using jquery
}
var t1 = performance.now();

var t0 = performance.now();
for(1 to 10000){
	//select with document.getElementById
}
var t1 = performance.now();

var t0 = performance.now();
for(1 to 10000){
	//select with document.querySelector
}
var t1 = performance.now();

After the tests are done, hopefully we’re going to have a clear answer as to which one of these methods we should use to speed up our script’s execution.

The Button Spawnner

The following is a simple algorithm used for spawning a button with id ‘id’, inside ‘container’ with text content ‘contents’:

We want to spawn quite a lot of buttons so let’s just start by placing a constant at the top of our script and set the number of buttons that we want to create. That way, if 10 thousand isn’t enough for us to reach a verdict we can return and change the number of buttons from a single point in our code:

const BTN_NUM = 10000;

We will also need a container div to host the remarkable amount of buttons we’re about to create:


<div id="mydiv">    
    
</div>

We select the div element using getElementById (or maybe we should use jQuery, it might be faster, or querySelector, anyway we’ll see in a moment 😛 )

let myDiv = document.getElementById('mydiv');

We also need to introduce a naming scheme for the 10k buttons so that we don’t have a hard time selecting them from the inside of a loop. It doesn’t have to be something complex. “btn-i” where ‘i’ is the incremented value will do just fine. So let’s spawn the buttons!!

let idPrefix = "btn-";
for(let i=0; i<BTN_NUM; i++){
	let name = idPrefix + i;
	spawnButton(name, myDiv, "Button");
}

If you run the script at this point, your browser window will fill with buttons capable of causing a seizure to people with light sensitivity but bear with me a little while longer and we’ll soon know which is the fastest method.

Let’s declare some required variables for our tests:

let t0, t1, jQueryPerformance, getElementPerformance, querySelectorPerformance;

And start them finally:

Running the tests I got these results (I ran each test three times to get a more definitive answer):

Google Chrome

chrome

Mozilla Firefox

firefox

Microsoft Edge


edge


The secret of C one-dimensional arrays

One thing that confuses newcomers to the C language, whο usually are newcomers to programming altogether, is the distinction between pointers and arrays. When you start learning C, you first learn about arrays. Every book or course teaches you statically allocated one dimensional arrays first. A statically allocated array is declared like this:

int array[10]; //Declares an array of 10 integers

One thing that confuses newcomers to the C language, whο usually are newcomers to programming altogether, is the distinction between pointers and arrays. When you start learning C, you first learn about arrays. Every book or course teaches you statically allocated one dimensional arrays first. A statically allocated array is declared like this:

int* dynamicArray= malloc(8*sizeof(int));

Let’s dissect the above statement. We have a pointer to an integer (array). If you’ve studied pointers, you know very well that a pointer to an integer is actually an integer itself that contains the address of an integer in memory. What happens next is that we use the malloc function that allocates memory for 10 integers on another memory segment, the heap. A ‘stack vs heaps argument’ could have an article on its own, but for now let’s just focus on the key difference between the two, which is the fact that everything that’s put on the stack lives as long as the function that created it lives. When that functions’ job is done, it gets kicked out of the stack and so are any variables, arrays or structures that were defined within it. On the contrary, everything allocated on the heap lives as long as the whole program lives in memory, unless we explicitly free that part of the memory. That’s another essential part of dynamic arrays that we are usually taughtË™ when we’re done with them we should ‘free’ them:

free(dynamicArray);   //Any memory that was used for this array now belongs to the operating system to utilize

The first question that popped into my mind when I started learning that stuff was: “How the hell can I tell the difference between a pointer to a single integer and a dynamically allocated array of who-knows-how-many integers?”

The missing piece of the puzzle was a small bit of information about arrays:
The name of the array (a.k.a the variable) is a pointer to the first element of the array.

Sounds confusing? Let me explain. The variable that you use to handle the array, like ‘dynamicArray’ in the above example, is actually a pointer to the first element of the array. Let’s say that our dynamicArray contains the following integers: 6,4,5,7,9,1,0,2

arr1

So we can get the first element just by dereferencing the pointer:

printf("First element = %d\n", (*dynamicArray));

Now, what about the second element? We can get that by moving the pointer one position to the right:

printf("Second element = %d\n", *(dynamicArray + 1));

The third element by moving two positions to the right:

printf("Third element = %d\n", *(dynamicArray + 2));

etc…

This sounds similar to the zero-based indexing of a statically declared array. If we wanted to get the first element of the array, we statically defined in the beginning of this article we would use this syntax:

int firstElement = array[0];

When you first learn about the zero-based index everyone tells you “that’s the way it is” and you’re left wondering why this:

int firstElement = array[0];

Is better than this:

int firstElement = array[1];

Now you know the reason why. It’s because the variable name points to the first element. And guess what, this applies to statically defined arrays too!

You see, the ‘dereference method’ of accessing array elements is not exclusive to arrays created using malloc. You can use it in plain old statically defined arrays too! Because the ‘array’ variable we used above is also a pointer. To better explain this, I’ve put together a small console application that shows that you can use both the indexing operator ( [] ) and the pointer dereference operator ( * ) with any array, whether statically or dynamically defined:

We start by defining two identical one dimensional arrays, the first one on the stack and the second one on the heap. We then go on and print the first and fifth element of each array using both methods, therefore proving that both methods can be used regardless of the way the array has been defined.

How to pass arrays as arguments

Now that we’ve dug deeper in the world of one dimensional arrays, let’s see how we can pass them around functions. To do that, let’s write a ‘printArr’ function that will print the contents of a one-dimensional array.

For a function to print an array, it needs to know two things: the array (duh) and its size. So we need a function that will take two arguments and since it won’t return anything, it can be void. So we have the function’s signature!

void printArr(int array[], int size);

The ‘[]’ syntax tells the compiler that this function expects its first argument to be an array.

Here’s the implementation. Nothing fancy, just a loop over the array contents and a call to printf

Now let’s use it to print the two arrays we defined earlier:

printf("Array contents:\n");
printf(array, 8);

printf("dynamicArray contents:\n");
printArr(dynamicArray, 8);

The results are:

arr_results

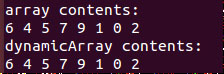
Which is correct, of course.

There is also another way to pass an array to a function. Instead of using the [] syntax, we could just pass a pointer since every array is actually a pointer to the first element!There is also another way to pass an array to a function. Instead of using the [] syntax, we could just pass a pointer since every array is actually a pointer to the first element!

There is also another way to pass an array to a function. Instead of using the [] syntax, we could just pass a pointer since every array is actually a pointer to the first element!

printf("Array contents (alternative method):\n");
altPrintArr(array, 8);

printf("dynamicArray contents (alternative method):\n");
altPrintArr(dynamicArray, 8);

What should I use

Okay, so, we learned that there are two ways to access an arrays’ content and there also are two ways to pass an array to a function. But which one should I use? Well, when it comes to accessing array elements, I personally believe that using the indexer operator makes your code cleaner, nicer and more comprehensible. As far as argument passing is concerned, someone might say that the pointer approach can get confusing when someone else reads your code because there is no immediate way of telling if the function accepts a pointer to a single element or an array.

It all comes down to personal preference though. I personally prefer using the indexing operator for accessing elements and I like using the pointer syntax for array arguments.

Conclusion

That was it! I hope you found this article helpful in your quest to master not only one-dimensional arrays, but C in general. The rest of the code can be found on GitHub. More stuff on C coming up soon. Thanks for reading. Keep coding!!

Measuring code execution performance in JavaScript

Performance Considerations

Developers and especially JavaScript developers can be extremely indecisive. “I’ve found multiple ways to achieve the same thing but which one is the fastest, the most appropriate? Which one is the optimal one?” Most of us would relate to such questions and although there is no definitive answer to which method you should choose, there are ways to make your struggle to reach a verdict a lot easier. One of the factors that will greatly affect your choice is the overall speed of the program. That’s not the only factor as others come into play, like cleanness, maintainability and speed of development but speed and efficiency are very important nonetheless.

How to measure time in JS

In the past the most prevalent method to take time measurements was new Date().getTime. However that approach was quickly abandoned as more features were added to the language. Console.time provided a nice alternative. Console.time is pretty simple. You just specify a string name for the timer and call the method to start counting. After the code you want to check has finished executing you call the method again providing the same name as the first and only argument:

console.time("mycode");

//code that takes some time

console.time("mycode");

The result gets printed in the console like this:

mycode: 355ms

Unfortunately Console.time (as you can read in its MDN page) is no longer standard and it’s use is therefore heavily discouraged.

Date().getTime is deprecated, console.time is non-standard, so how can I measure my code’s execution time?

When it comes to raw performance measurement in JavaScript performance.now is the way to go. The Performance interface contains various performance related methods (duh!) you can use to take measurements for time-related stuff. Now() is the interface’s method you will probably use the most and this method is the one described in this post.

.now()


The method’s functionality is pretty simple and straight-forward.
The Performance.now() method returns a DOMHighResTimeStamp, measured in milliseconds, accurate to one thousandth of a millisecond. (thanks MDN <https://developer.mozilla.org/en-US/docs/Web/API/Performance/now> ).


let timeBefore = performance.now()


someMethod();


let timeAfter = performance.now()


let diff = timeAfter - timeBefore;


console.log("Diff: " + diff);


To demonstrate the use of performance.now in a more real-life example let’s count how much time it takes to fetch 5000 photos from JSONPlaceholder (https://jsonplaceholder.typicode.com/)

We declare timeBefore right before calling fetch and timeAfter right after the data has been parsed and printed to the console window. The result gets also printed in the console.

You can see the results of three consecutive executions in the next screenshot (Google Chrome):

untitled-1